
https://www.youtube.com/watch?v=Nd33Ry2t88o
Git repositories and directories
Each Git repository is tied to a specific directory – the directory where you ran git init. Only files from that directory (and subdirectories inside that directory) will be contained in that repository, and you can have different repositories in different directories.
Note: it’s often the case that a Git repository in some directory will only contain, or track, some of the files in that directory, rather than all of them. You’ll see how this works later this lesson.

Reflect: Initializing a Repository
Now that you’ve initialized your first repository, go to your reflections directory, create a new file called lesson_2_reflections.txt, and add the following question and your thoughts on it:
What happens when you initialize a repository? Why do you need to do it?
You may also wish to run git status after you have created the file. You should see that now both files are listed as untracked files.
When you’ve created and updated your reflections document for lesson 2, click “Next.”
المواد الداعمة

If you accidentally add a file to the staging area, you can remove it using git reset. For example, if you accidentally add lesson_2_reflections.txt, but don’t want it to be committed yet, run git reset lesson_2_reflections.txt and the file will be removed from the staging area, but it will still be in your working directory.
Concept Map: init, add, staging area
We’ve introduced a few new concepts since we last revisited our concept map.
- git init
- git add
- git status
- staging area
- working directory
Previous Version
Remember our concept map from last lesson? Here’s what it looked like the last time we added a new concept.
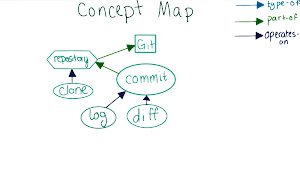
Where Do the New Concepts Go?
Here’s the structure we’ve come up with for how to add these new concepts in to the map. Which concept belongs where?

In the following quiz, write in the concept that you think belongs in each new empty node.

Reflect: Staging Area
Now that you’ve added a file to the staging area (or maybe multiple files!), go add the following question and your thoughts on it to your lesson_2_reflections file:
How is the staging area different from the working directory and the repository? What value do you think it offers?
When you’ve updated your document, click “Next” and Caroline will go over how to commit the changes you’ve added to the staging area.
How to write a commit message
You’re about to make your first commit to your reflections repository. When you do this, you’ll need to write a commit message describing your changes. If you followed the instructions in the “Setting Up Your Workspace” video for your platform near the end of Lesson 1, the editor you chose will appear as soon as you run git commit and allow you to write a commit message. If you get an error message, you should try revisiting the instructions in Lesson 1 and make sure your text editor is set up properly.
You can also specify a commit message via the command line by running git commit -m "Commit message" instead of just git commit. It’s still a good idea to get an editor set up, since this will make it easier to write long commit messages that fully describe the change.
Commit message style
While commit message style varies from person to person, this style guide describes some common best practices when writing commit messages.

https://www.youtube.com/watch?v=jRke2hKyqmo
Git cheat sheet
You’ve just learned several Git commands pretty quickly. If you’d like some help keeping track of them, you might be interested in this Git cheat sheet. By now, we’ve covered the commands in the sections “Configure Tooling”, “Create Repositories”, and “Make Changes”. You’ll be learning many of the remaining commands on this sheet throughout the rest of this course.
If you are following along, you should run git checkout master before you commit. This is because your HEAD is still ‘detached’ from Lesson 1 when you checked out an old commit, and running this command will fix that. You’ll learn more about what this command does later this lesson.

Leave ‘detached HEAD’ state
Right now, your HEAD should still be ‘detached’ from Lesson 1 when you checked out an old commit. To fix that, run the command git checkout master. You’ll learn more about what this command does later this lesson.
Fix the delay bug
Now, if you were following along with Caroline, you may have already fixed the bug in the Asteroids repository. If not, go ahead and make the change and add it to the staging area now.
In game.js find the statementif (this.delayBeforeBullet <= 0) { (should be on line 423). On the next line, insertthis.delayBeforeBullet = 10;
Stage your change
Then stage your change by adding the game.js file to the staging area. If you’re having trouble remembering how to stage changes, use this video as a refresher.
Commit your change
Now, go ahead and commit this change. Make sure to use a meaningful commit message! If you have trouble remember how to commit, refer to this video.
When you’re finished committing your change, click “Next”.
You may notice that our commit id is different from yours, even though we made the same change, while the commit ids up to this point have all been the same. That’s because if there is any difference between two commits, including the author or the time it was created, the commits will have different ids. Check out this page if you’re interested in learning more about Git internals and how commit ids are generated.
Reflect: Commit Size
Now that you’ve committed changes using the staging area, go add the following question and your thoughts on it to your lesson_2_reflections file:
How can you use the staging area to make sure you have one commit per logical change?
You may also want to commit your changes to the file. When you’re ready to move on, click “Next” and Sarah will go over a concept called branching.

Reflect: When to Use Branches
Now that you’ve learned how to create a branch in Git, go add the following question and your thoughts on it to your reflections file:
What are some situations when branches would be helpful in keeping your history organized? How would branches help?
You may also want to commit your changes to the file. When you’re ready to move on, click “Next” to hear a perspective from an experienced Git user.

https://www.youtube.com/watch?v=B8qKGCtKBLY
Viewing the commit history
The full command Caroline types to see the visual representation of the commit history is git log --graph --oneline master coins.
Checking out the coins branch
Note that you’ll need to check out the coins branch using the command git checkout coins before you can view the coins branch using git log.

Reflect: Visualizing with Diagrams
Now that you’ve had some experience creating branches and drawing diagrams of your history, go add the following question and your thoughts on it to your reflections file:
How do the diagrams help you visualize the branch structure?
You may also want to commit your changes to the file. When you’re ready to move on, click “Next.”


If a branch is deleted and leaves some commits unreachable from existing branches, those commits will continue to be accessible by commit id, until Git’s garbage collection runs. This will happen automatically from time to time, unless you actively turn it off. You can also run this process manually with git gc.


https://www.youtube.com/watch?v=AJMVjcKdv04
Checking out the coins branch
If you haven’t already checked out the coins branch, you’ll need to do so now with the command git checkout coins before you’ll be able to refer to it. Once you’ve done that, decide whether you should keep it checked out or check out a different branch before completing the merge.
A note about git merge
git merge will also include the currently checked-out branch in the merged version. So if you have branch1 checked out, and you run git merge branch2 branch3, the merged version will combine branch1 as well as branch2 and branch3. That’s because the branch1 label will update after you make the merge commit, so it’s unlikely that you didn’t want the changes from branch1 included in the merge. For this reason, you should always checkout one of the two branches you’re planning on merging before doing the merge. Which one you should check out depends on which branch label you want to point to the new commit.
Since the checked-out branch is always included in the merge, you may have guessed that when you are merging two branches, you don’t need to specify both of them as arguments to git merge on the command line. If you want to merge branch2 into branch1, you can simply git checkout branch1 and then type git merge branch2. The only reason to type git merge branch1 branch2 is if it helps you keep better mental track of which branches you are merging.
Also, since the two branches are merged, the order in which they are typed into the command line does not matter. The key is to remember that git merge always merges all the specified branches into the currently checked out branch, creating a new commit for that branch.
Merge conflict
If you get a message like this
Auto-merging game.js
CONFLICT (content): Merge conflict in game.js
Automatic merge failed; fix conflicts and then commit the result.
then your files were not in the same state as Caroline’s when you started the merge. To fix this, complete the following steps:
- Restore your files to their state before you started the merge by running
git merge --abort - Double check the state of your files. If you run
git logwhile the master branch is checked out, you should see Caroline’s “Add color” commit as the second-most-recent, and the most recent should be your commit fixing the bullet bug. If you usegit diffto compare your commit to Caroline’s, your commit should introduce the linethis.delayBeforeBullet = 10;on line 424. The line should be indented to the same level as the line below it using only spaces (no tabs), and the line should have no spaces after it. - Once your file is in the correct state, create a new commit with your changes.
- Try the merge again.
Merge conflict (Newline characters between Windows and Unix systems)
Context: Whenever we hit the “Enter” key on the keyboard, we are actually telling the computer to insert an invisible character into our text file to indicate to the computer that there should be a new line. Unix systems adds one character called the “line feed” character or LF or \n while Windows systems adds two characters, “carriage return” and “line feed” or CRLF or \r\n.
Caroline’s files have LF because her files were edited on Mac OSX, which uses LF. If a Windows user were to edit Caroline’s files, the Windows text editor might convert all LF to CRLF to make editing files possible. When the Windows user merges her file with Caroline’s files, a merge conflict will result due to the different LF and CRLF characters.
To fix this, Windows users should set the global autocrlf attribute to true: git config --global core.autocrlf true. More information can be found here: https://help.github.com/articles/dealing-with-line-endings/#platform-all
Comparing a commit to its parent
The command Caroline mentions to compare a commit to its parent is git show commit_id
Reflect: Merging Two Branches
Now that you’ve learned how to use Git to merge branches together, go add the following question and your thoughts on it to your reflections file:
What is the result of merging two branches together? Why do we represent it in the diagram the way we do?
You may also want to commit your changes to the file. When you’re ready to move on, click “Next” and Sarah will explain why this automatic merge process won’t always be possible and what happens instead.

Update Easy Mode
Motivation
Master has updated since the easy-mode branch was created. In this case, it has the addition of coins, which you might like to include in the easy-mode branch. In general, it’s very common that if you make a branch, either an experimental branch or to work on a new feature, you want to periodically merge master into that branch. This is because master usually contains the official version of the code, and it’s common to want experimental changes to include all of the changes to master.
Previous version of the diagram
Here’s what the history looks like right now.

https://www.youtube.com/watch?v=e4iPtFApdsI
Draw an updated diagram
If you merge master into the easy-mode branch, what will the history look like afterward? Take a minute to draw the new history using whatever method you like best. You might want to use pencil and paper, or create a text file with stars and dashes similar to the output of git log --graph, or maybe use an online diagramming tool like gliffy or yUML. Once you’re finished, watch the solution to compare your diagram to Sarah’s.

Asteroid = function() {
this.breakIntoFragments = function () {
for (var i = 0; i < 3; i++) {
var roid = $.extend(true, {}, this);
roid.vel.x = Math.random() * 6 – 3;
roid.vel.y = Math.random() * 6 – 3;
if (Math.random() > 0.5) {
roid.points.reverse();
}
roid.vel.rot = Math.random() * 2 – 1;
roid.move(roid.scale * 3); // give them a little push
Game.sprites.push(roid);
}
};this.collision = function (other) {
SFX.explosion();
if (other.name == “bullet”) Game.score += 120 / this.scale;
this.scale /= 3;
if (this.scale > 0.5) {
<<<<<<< HEAD
// break into fragments
for (var i = 0; i < 2; i++) {
var roid = $.extend(true, {}, this);
roid.vel.x = Math.random() * 6 – 3;
roid.vel.y = Math.random() * 6 – 3;
if (Math.random() > 0.5) {
roid.points.reverse();
}
roid.vel.rot = Math.random() * 2 – 1;
roid.move(roid.scale * 3); // give them a little push
Game.sprites.push(roid);
}
||||||| merged common ancestors
// break into fragments
for (var i = 0; i < 3; i++) {
var roid = $.extend(true, {}, this);
roid.vel.x = Math.random() * 6 – 3;
roid.vel.y = Math.random() * 6 – 3;
if (Math.random() > 0.5) {
roid.points.reverse();
}
roid.vel.rot = Math.random() * 2 – 1;
roid.move(roid.scale * 3); // give them a little push
Game.sprites.push(roid);
}
=======
this.breakIntoFragments();
>>>>>>> master
}
};
};
Near the beginning of the video, Caroline accidentally says “I still need to let Git know that the conflict is reserved.” She meant “resolved”, not “reserved”.

Concept Map: branch, merge
Here’s where we left off with the concept map:

New ideas
Since then, we’ve talked about a few new ideas. The biggest ones are the ideas of branching and merging.
Where do branching and merging fit best in the Concept Map? Continue to the quiz to add them.


Reflect: Automatic vs. Manual Merging
Now that you’ve learned when Git will not be able to automatically merge branches, and what happens when it can’t, go add the following question and your thoughts on it to your reflections file:
What are the pros and cons of Git’s automatic merging vs. always doing merges manually?
You may also want to commit your changes to the file. When you’re ready to move on, click “Next” to hear from Jeffrey again about how he uses some of the tools you’ve learned about in this lesson.
